Checking in members at the front desk
For: Front-desk Staff, Instructors, Managers & Owners
You can check a member in from anywhere in the back office using the Check in a member quick action in the top bar. It opens a single dialog that handles both a QR scan and a name search, so you never leave the screen you're on.
Opening the check-in dialog
- Click the scan icon (labeled Check in a member) in the top bar.
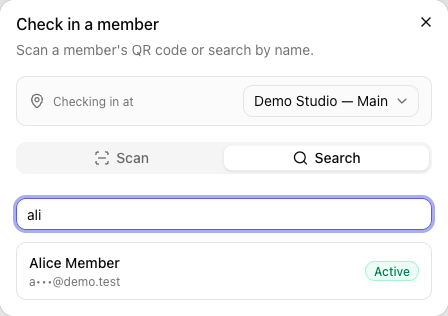
- The Check in a member dialog opens. If your studio has more than one location, the dialog shows Checking in at with the current location — check it's right before you start, or pick another from the dropdown.
The dialog has two tabs: Scan and Search.
Scan a QR code
- Select the Scan tab.
- Ask the member to open their check-in code in the ClassLift app.
- Point the code at your device's camera, or scan it with a connected barcode reader — both work the same way.
- ClassLift checks the member in and shows a result (see Result messages).
A connected USB or Bluetooth barcode reader works without any setup — just scan the member's code while the Scan tab is open.
Search by name
Use this when a member doesn't have their phone or their code won't scan.
- Select the Search tab.
- Type the member's name or email (at least two characters).
- Matching members appear, each with a masked contact detail to tell people with similar names apart, and a badge showing their membership status.
- Click the right member to check them in.
Result messages
After each check-in, a colored banner appears for a few seconds:
| Result | What it means |
|---|---|
| Checked in! / Welcome, name! (green) | The member was checked in. If they had a class booked nearby, you'll also see "Marked attended for a booked class." |
| Couldn't check in (red) | The check-in didn't go through — the message explains why (for example, an expired code). |
Membership status heads-up
If you check in a member whose membership isn't active, the result includes a note like "Heads up — membership is past due." The check-in is still recorded — the note is there so you can decide how to handle it at the desk. (Hard access rules for doors are handled by access control, not the front desk.)
Checking in a whole family in one scan
A guardian can check in their dependents at the same time:
- On the Scan tab, scan the guardian's QR code.
- ClassLift shows Who's checking in? with the guardian and their dependents, everyone pre-selected.
- Tap anyone who isn't here to deselect them, then click Check in N people.
This is how a parent and child (for example, mother and daughter) check in together from a single scan — the child never needs their own login or code.
Checking members in from a class roster
If someone forgot to check in at the desk, you can fix attendance directly from the class:
- Open the class occurrence on the Schedule.
- In the roster, find the booked member. The heading shows Booked · checked-in/capacity so you can see attendance at a glance.
- Click Check in next to their name. This records a real check-in and marks the booking attended — the same as a desk or kiosk check-in.
- To mark the rest of a finished class, click Finalize no-shows. To flip a mistaken no-show back, use Mark attended.
Tips
- Scanning is fastest. Encourage members to keep their check-in code handy — the Scan tab identifies them instantly and matches their booking for you.
- Watch the location. At a multi-location studio, confirm Checking in at shows the site the member is actually at, so their visit lands in the right place.
- You don't need to find the booking. Just check the member in — ClassLift matches the class automatically within the grace window.