Kiosk mode
For: Owners & Managers
Kiosk mode turns a tablet at your entrance into a self-service check-in station. Members scan their QR code or search their name to check themselves in — no staff required. Each location has its own secure kiosk link and settings.
Prerequisites & permissions
- You need owner or manager access to configure a kiosk.
- The location must already exist (set it up under Facilities → Locations first).
Turning on a kiosk
- Go to Facilities → Check-in in the sidebar.
- Find the location you want and turn on Self-service kiosk.
- Set the options that appear (below), then click Save.
When you save with the kiosk enabled, ClassLift generates a secure Kiosk link for that location.
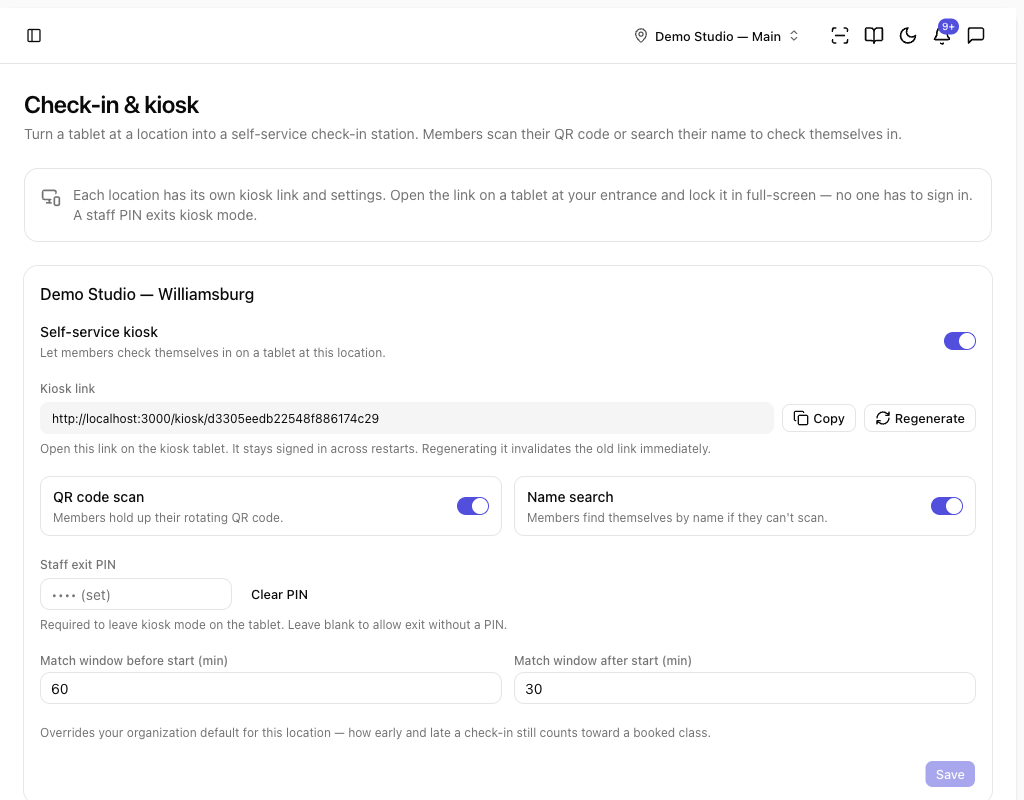
Kiosk settings
| Setting | What it does |
|---|---|
| Kiosk link | The secure URL you open on the tablet. It stays signed in across restarts, so no one has to log in on the kiosk. Copy it to your device, or Regenerate it to invalidate the current link and create a new one. |
| QR code scan | Members check in by holding up their rotating QR code. On by default. |
| Name search | Members find themselves by name if they can't scan. On by default. |
| Staff exit PIN | A 4–12 digit PIN required to leave kiosk mode on the tablet. Leave it blank to allow exit without a PIN (not recommended). |
| Match window before / after start (min) | This location's override of your organization's check-in grace window — how early and late a check-in still counts toward a booked class. |
Regenerating the kiosk link
If a link is shared by mistake or a tablet is lost, click Regenerate next to the kiosk link. The old link stops working immediately — update any tablets or bookmarks with the new one.
Setting up the tablet
- In Facilities → Check-in, click Copy next to the kiosk link.
- Open the link in a web browser on the tablet, or paste it into your device-management (MDM) tool.
- Put the browser in full-screen and lock the tablet to it (Guided Access on iPad, Screen Pinning on Android).
The kiosk keeps the screen awake on its own, so you don't have to change the tablet's sleep settings.
How members use the kiosk
Scanning a QR code (primary):
- The kiosk shows Check in with a camera and the prompt "Hold your QR code up to the camera."
- The member opens their check-in code and holds their phone up to the camera.
- The kiosk confirms with You're checked in! and resets for the next person after a few seconds.
Searching by name (fallback):
- The member taps Can't scan? Search your name.
- They type their name and pick themselves from the list (a masked phone number helps tell people apart).
- The kiosk confirms the check-in.
Family check-in: when a guardian scans their own code, the kiosk asks Who's checking in? and lists the guardian and their dependents — they select everyone present and confirm. See front-desk check-in for more on family check-ins.
If a check-in can't go through — an expired code or an inactive membership — the kiosk shows a clear message asking the member to try again or see the front desk.
Exiting kiosk mode
- Tap the key icon in the top corner of the kiosk screen.
- Enter the Staff PIN to exit and tap Exit.
If no PIN was set, the kiosk exits without one.
Tips
- Mount the tablet at the entrance, camera facing members, so they can hold their phone up as they walk in.
- Always set an exit PIN so members can't accidentally leave kiosk mode.
- Keep the tablet plugged in — the always-on screen and camera drain the battery quickly.
- Use both methods. Leaving QR scan and name search on covers members whether or not they have their phone handy.
- Manage a fleet with MDM. For multiple locations, push each location's kiosk link to its tablets through your device-management tool and lock them to the browser.