Managing your public page
For: Owners & Managers
Your public page is built automatically from what's already in ClassLift — there's no separate website to design. This page explains the levers that shape what appears, so you can make it look its best.
What shapes your page
| What visitors see | What drives it | Where you set it |
|---|---|---|
| Logo & name in the header and hero | Your organization logo and name | Settings → Organization |
| Membership plans | Your active plans that are shown on the public sign-up page, cheapest first | Membership Plans |
| The Most popular plan | The one plan you featured | Creating a plan |
| Upcoming classes | Your scheduled sessions | Scheduling |
| Locations | Your active locations | Facilities → Locations |
| Whether the page is live | Your organization being active | account status |
Making it look its best
- Upload a clean logo under Settings → Organization — a square, transparent PNG or SVG looks best in the header and hero.
- Publish the plans you want to sell — only active plans that are shown on the public sign-up page appear, listed cheapest first. Retire plans you don't want shown.
- Feature your best plan — turn on Feature as "Most popular" on the one plan you most want people to pick, and it's highlighted with a Most popular label and a filled Join now button. Only one plan can be featured; if you feature none, every plan is shown with equal weight. See Featuring your best plan.
- Keep your schedule full — the Upcoming classes section shows your next sessions, so a healthy calendar makes the page look active.
- Keep your locations active — active locations appear under Where to find us; a temporarily-closed one drops off.
What visitors do next
Every Join now / Choose your plan button takes a visitor to join on that plan: they create an account (or sign in) and complete their membership — paying by card for a paid plan. From there they're a full member who can book and check in.
Already have your own website?
You don't have to send people to your ClassLift page at all. If you already have a website you're happy with, add a Join button that links straight to your sign-up page:
https://your-studio.classlift.app/join
Replace your-studio with your own web address — it's shown on Settings → Organization.
Visitors who follow that link go straight to Choose your membership: your plans, cheapest first, with your Most popular plan highlighted. They never pass through your ClassLift page, so your own site stays the front door.
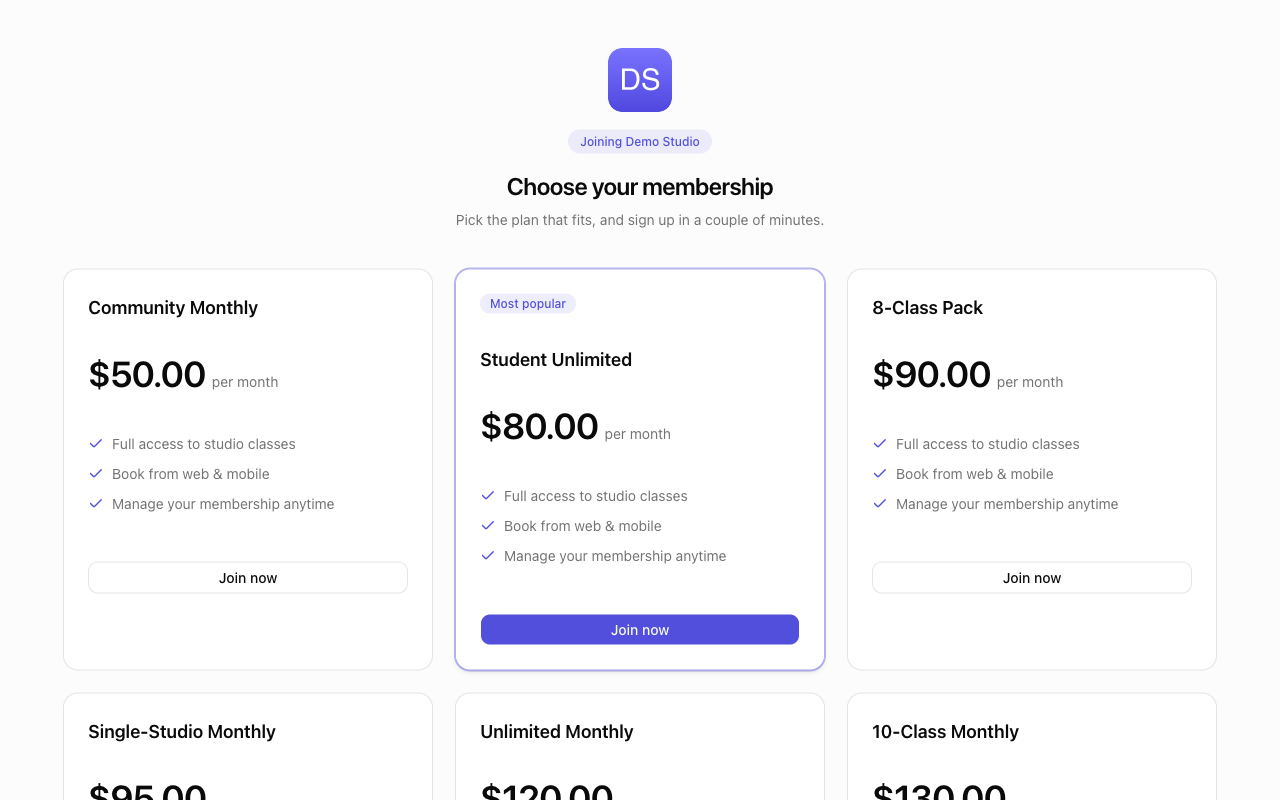
From there it's the same flow as always — pick a plan, create an account, pay, done.
Tip: This is the link to use in an Instagram bio, a Google Business profile, or an email campaign — anywhere you want people going straight to sign-up rather than browsing.
Good to know
- Your web address (subdomain) is fixed — it's shown on Settings → Organization as not editable. Contact ClassLift if you need it changed. You chose it when you created your organization; a handful of common reserved words (like app, admin, mail, or billing) aren't available, so if one was taken you were asked to pick another.
- Your page only goes live while your organization is active; before that, visitors see a friendly "studio not found" message.
Troubleshooting
| Issue | What to do |
|---|---|
| My page shows Plans coming soon | You have no active plans — publish one under Plans. |
| A plan I retired still needs removing | Retired plans drop off automatically; only active plans show. |
| No plan shows Most popular | No plan is featured. Edit the plan you want to highlight and turn on Feature as "Most popular" — see Featuring your best plan. |
| The wrong plan is badged Most popular | Feature the plan you actually want — doing so removes the badge from the previous one automatically. |
| I featured a plan but my page hasn't changed | Your public page is cached for up to an hour for speed, so a change can take a little while to appear. |
| The schedule looks empty | Add classes and schedules so upcoming sessions appear — see Scheduling. |
| A visitor sees "studio not found" | Your organization isn't active yet, or the address is wrong — check your web address on Settings → Organization. |